


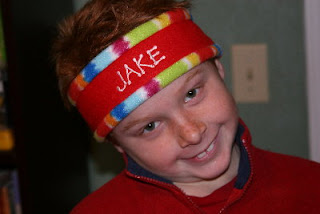

 For my son's school party this Christmas, I decided to make a personalized headband for each of his classmates.
I started by machine-embroidering their names onto a piece of fleece, but this project can also be done without the names. Otherwise, if you don't have an embroidery machine available to you but still want to personalize yours, you could also embroider them by hand or use other personalizing methods, such as stenciling or iron-on transfers.
 I use a Singer Futura, which is just a hobby machine, but it was reasonably priced and works well for what I like to do. I plan to do a review post on it shortly, for those of you that have no familiarity with embroidery machines.
 I embroidered their names before cutting the fleece apart, so I could get the most out of the fabric.
 I did the boys' names on red and the girls' names on lime green.
 After I was done stitching and cut the names apart, I applied a little glue to the backside of the stitching to prevent unraveling.
 The solid-colored pieces are 2" wide, and the coordinating backside pieces are 4 1/2" wide. Both parts are about 23" long, but that will vary slightly depending upon what size head you're trying to fit.
When you cut your fleece, test the fabric to see if it stretches more one way over the other. Ideally, you'd like to have the stretchy direction going around the head. This isn't always possible if the print isn't going in the direction you want.
 Next, I lined up the two parts of fleece, with the "right" sides together. With fleece, it's sometimes difficult to determine the right side. My philosophy is that if I can't tell, it's not likely anyone else will be able to tell either. Of course, it is important for the piece with the name.
 I stitched the edges that were aligned, leaving only about a 1/4" seam.
 Next, I aligned the other sides. Since the one piece of fabric is wider, there will be a fold in the wider piece in order to correctly line up the open sides.
 I stitched these edges together, again leaving about a 1/4" seam.
 Next, I turned the piece of fabric right side out.
 I laid the piece flat to align the edges.
 Next, I folded the piece in half and aligned the raw ends, making sure the name would be centered on the finished item.
 I used pins to hold everything where I wanted it, so that the seam lines wouldn't slip out of place.
 I sewed the end. Mine needed to be about 22" around to fit the students in my son's class.
 After stitching, I used pinking shears to trim the excess.
 Since fleece doesn't fray, this was all the finishing I did. Plus, it will be on the inside where it isn't seen when worn.
 And that's it!
 One for each of the 23 students in the 4th grade.
 And the fabric I used makes them coordinated but unique.


Check back for the embroidery machine review I mentioned.
And don't forget to check out the endless list of inspirational ideas at my home page, childmade.com.
