


 This little snowman family diorama came to fruition over a number of years. I had put together the little family made from glove fingers some time back, but wasn't quite sure what to do with them after that. Then this year at Dollar Tree, I came across these shadowbox frames and the idea just popped.
 For supplies, you will need:
- 1 glove finger for each family member
- 1 shadowbox frame large enough to hold the completed family (larger family = larger frame)
- 1 sheet of cardstock with appropriate print for the background
- 1 sheet of white cardstock
- white felt, measuring a little more than half the size of the frame
- orange felt for the nose
- mini black pom-poms (2 for each snowman)
- assorted ribbons, trims, scraps and other tiny embellishments (eg. rick-rack, sequins, etc.)
- blush
For tools, you will need sharp scissors, tacky glue, and a glue stick, and access to a printer or alternate method for adding the names to the matting.
 The first thing you'll want to do is prepare the matting. This will vary depending upon the size of the frame. I suggest laying out the "family" to estimate the size of the window you'll need. There should be about 1" of matting.
 Prepare the matting from the cardstock.
I did mine using a simple word processing package. First I drew a square (I made a table with one column and one row, with a border) then inserted the family surname above the box and the individual family member names below. I printed the document centered on the page so I had room to trim around the outside. Then I cut out the window slightly inset from the printed box to give a little extra depth.
 Next, insert the matting into the front of the frame, and secure as necessary (from the back.)
The frames I purchased had a cardboard edge inside the frame that I needed to work around to get my matting to fit in properly without the cardboard showing from the front. The advantage was that then I didn't need to do anything to secure it in place as the cardboard was already doing that for me. If yours doesn't have this, a few pieces of scotch tape is really all you need. Just be sure to secure it from behind so it doesn't show from the front.
 Next, take note of the back mounting. You'll want to make sure that you position the back properly, as you'll be mounting your snowman family directly onto the frame backing. Make sure that the "top" is positioned to the top.
 Now it's time to start arranging your diorama. Begin by placing your backing. Apply a piece of the "sky," covering at least half of the area, and glue in place.
NOTE: For this step and the following, you want to make sure that your "scene" is slightly smaller than the backing for the frame.If you don't allow some space around the edges, then when you put the backing into the frame, it bulges in an unappealing way and doesn't want to mount properly. The matting on the front of the frame will hide any raw edges.
 Next, using some of the white cardstock, cut a wavy edge.
 Glue the wavy edge to the backing, covering the raw edge of the sky print. (Note the space around the edges.)
 Set the frame onto the backing to get an idea of how things are going to look. I recommend you do this periodically while arranging your scene to prevent accidental misplacement.
 Arrange your glove fingers for your snowman family. Set the frame in place to view the arrangement. Make adjustments as necessary and then glue the glove fingers in place.
 Next, cut some snowbanks from the white felt. For my 6"x8" frame (4"x6" mount,) I used two pieces of felt, 2" and 2 1/2" inches tall. Yours will vary depending upon the size of your frame.
 Align the first snowbank covering the bottoms of the glove fingers. Set the frame in place to confirm the alignment. Adjust as necessary, then glue in place.
 Repeat with the second snowbank.
 Now it's time to start making snow-people. Use the black poms and the orange felt to make faces for the snowmen, and glue them in place. You could try adding a mouth of your own design, but the work is very tiny and a bit difficult to maneuver.
 Next, using whatever embellishments you have gathered, begin dressing your snowmen. This is a great step for using things from your scrap bin. Be sure to be sensitive to the edge of your matting, so your dressing isn't lost at the edge.
 When you're finished dressing them, add a little blush to their cheeks.
 The blush is optional but it gives them all a rosy, wintry look.And the last step is to place your snowman family scene into your shadowbox frame.
Because of the thickness of the scene, you won't be able to slide the backing more than about an inch. My frames were pretty flexible, and the backing was pretty bendable, so between the two, I was able to insert my backing without having to slide it much at all. Keep this in mind when purchasing your frames. Alternatively, you might be able to work on a secondary piece of cardboard, separate from the backing, which might give you a little more flexibility.
 I hope you enjoy this as much as I have. Please let me know if you give this a try! I'd love to see your finished project! Oh, and I LOVE comments, too.
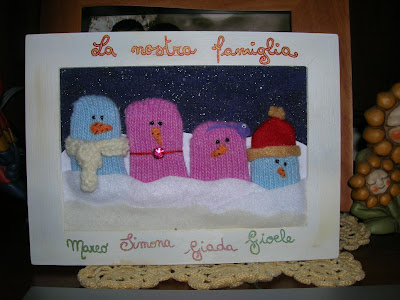
Helen sent me this image of a snowman family she put together, but she added a twist and did it with paper. I think it turned out fabulous! I love the colors, and I especially love the little glasses on Daddy!

And check out THIS cutie made by Honey at Daisies Are My Favorite Flower! Her sister included her fur babies. Too fun!

Amy at Day by Day put together this little lovely! I adore the hats, and confess that I haven't quite mastered them looking so cute!

Here's a fun colorful version!
One done in a recycled frame at Wiccan Make Some Too...

Check out the variety at In The Moment...

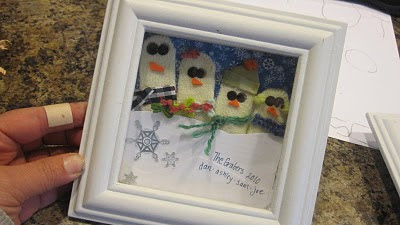
Check out this one done by Guatmama at The Graber Gab. She was able to do hers without having to purchase anything. I say, "Well done!"
Peechee at Candy, Cake and Crafts put together several that turned out just great! She was even brave enough to add mouths!
 Christine from Brooklyn, New York, embellished hers with a little extra "fluff" of snow on the outside of the frame.
Okay, this is a recent entry and simply wonderful! I love the dark blue background! Thanks for the submission!

Let me know if you do one so I can add you to the examples!
And be sure to check out the endless list of inspirational ideas at my home page childmade.com.

I'll be linking to some of the fabulous link parties listed on the right sidebar ... but really, that's a LOT of parties! I probably won't get to them all, but you should stop in and visit a few yourself. While you're at it, stop by my home page and add a few links there too!