This little guy can be dressed in various ways, like with a felt vest or stocking cap, even some little boots. We went with a simple scarf and ear muffs.
 For supplies, you will need the following:
- white felt (self-adhesive felt works great!)
- red fabric or felt
- fabric for a scarf
- sturdy but pliable wire
- 2 poms for the ear muffs
- orange felt for the nose
- 2 buttons
- 6-8 seed beads for the eyes and mouth
- gold string for a hanger
For tools, you will need scissors, wire cutters, tacky glue, and (optionally) hot glue.
 Begin by cutting a template for your snowman, making a shape that's appealing to you. We're making ours about 6" tall, but you can adjust larger or smaller. (Smaller ones would make great lapel pins.) Then, use the template to cut two snowman shapes from the white felt.
 Cut a length of wire for the arms. Apply a generous layer of glue to one of the felt snowman pieces. Place the length of wire in position for the arms. If needed, add more glue around the area of the wire to ensure stability. Alternatively, self-adhesive felt makes this step less messy.
 Place the other snowman felt onto the glued section, sandwiching the wire between the two sides.
 Next, create a template for your mittens, and cut two sets of the mittens from the red fabric.
 Apply some glue to one of the mitten sets and place the mittens around the tips of the wire.
 Repeat for the other side.
 Next, place the scarf around the neck of the snowman.
 Gently tie the scarf around to the front.
 Use scissors to snip fringe into the ends of the scarf.
 Apply glue to the front of the snowman to secure the ends of the scarf.
 Position the scarf into the glue.
 Next, add a couple of buttons to the belly of the snowman.
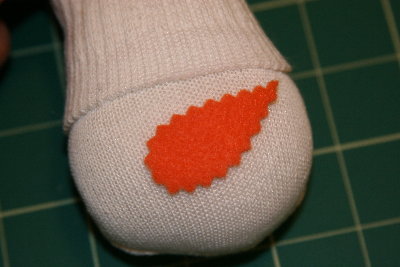
 Cut a nose from the orange felt. Pinking shears add a nice edge if you have any handy. Glue the nose to the center of the face.
 Next, glue the eyes.
 Draw a thin line with glue for the mouth and apply the seed beads. Try using a pin to maneuver the tiny beads into position. The glue keeps the seeds from rolling away and dries invisible.
You could also apply some blush to the cheeks. Then, set the snowman aside to dry for a few minutes.
 Twist another length of wire into a curled shape for the ear muffs and trim to size.
 Use hot glue to secure the poms to the ends of the wire. You can use tacky glue, but the ear muffs will need to be set aside to dry.
 Position the ear muffs and glue in place.
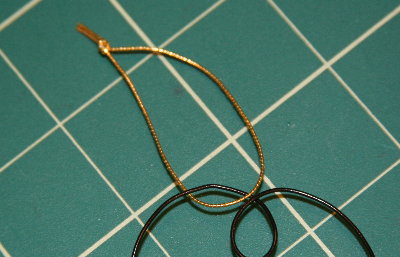 Tie the gold string in a loop around the wire of the ear muffs for a hanger.
 As soon as he's dry, he'll be ready to decorate your tree or add some cheer to a package.
 While you're at it, make several! Since he's flat, he stores very neatly.
Try some different outfits while you're at it! If you give this project a try, please let me know and I'll link you up. I'd love to see what you come up with!
And be sure to check out the endless list of inspirational ideas at my home page childmade.com.

I'll be linking to some of the fabulous link parties listed on the right sidebar ... but really, that's a LOT of parties! I probably won't get to them all, but you should stop in and visit a few yourself.
While you're at it, stop by my home page and add a few links there too!