


 ... and this one is a wonderful little vegetable garden!
I had so much fun putting this together! It was one of my most difficult (having to draw out and digitize all the designs) but also one of the most rewarding. Even if my son doesn't think it's the greatest thing since sliced bread, I had such a great time that I won't even care. Plus, I think this would make a great activity by itself, without the related chores. Follow along and I think you'll agree.
 The first thing I did was draw out a variety of vegetables and digitize them for my embroidery machine. Having learned previously from my Ice Cream Chore Chart, I opted to use a printed cotton for the background color and stitch the shape of the vegetable.
 I backed the designs with a stiff white fabric, gluing the outline on the sides and top of the design, but leaving the bottom and center loose. When it was dry, I trimmed the designs to within about 1/8" of the stitching. I still need to apply some anti-fray to the edges.
 Next, I opened the bottom ...
 ... and inserted a popsicle stick, gluing it in place.
 I made a pumpkin, watermelon, radishes and beets, ...
 ... asparagus, turnips, carrots, and tomatoes, ...
 ... lettuce, cellery, and corn. I still need to do eggplant, onions, and yellow squash, and maybe some mushrooms, broccoli and cauliflower. The variety in shape and color makes the finished product really bright and cheery.
The next step was to prepare the garden. There are any number of ways to do this, and if you put one together, I would love to see yours (I'll even feature a link-up!) I wanted mine for the wall, but it could also be done in a desktop version. I had originally planned on having it be just fabric, but I was shocked at the way the popsicle sticks snagged into the fabric, even though they felt perfectly smooth to the touch . I even tried sanding mine without any real success. Perhaps it would help if they were varnished. Anyway, keep that in mind if you give this a try.
 First, I grabbed a cereal box from the recycle bin. I used a ruler to draw parallel lines at an angle on both sides.
 Then I cut the sides and continued through the ends. When finished, I was left with two equal 4-sided "trays" that sat at an angle.
 I flipped the box over and drew parallel lines inside about 2 inches apart. These lines represent the "rows" of the garden.
 Next, I used a razor knife to cut slits out of the row. I made the slits about 1/4" wide, in varying lengths and varying positions to account for the fact that my veggies are different sizes and shapes. The slits needed to be wide enough to fit the popsicle sticks loosely, without being too wide such that the veggie would slip through.
 I repeated this with all the rows. It's not important that this step look neat, as it won't be visible on the finished product. It's more important to focus on the size and alignment. I experimented a bit with the finished veggies to get the correct size and placement.
 Next, I placed the second half of the cereal box inside the first one, matching the angle of the first box. I left a 1/2-inch gap between the two boxes and glued it in place. I didn't put any spacers between the two box parts, but would probably suggest it if your little one might be a little rough with the finished product.
 The gap allows room for the popsicle sticks to fit through, while keeping them from flipping forward from the weight of the veggie, plus it gives the garden a 3-dimensional effect.
 Hopefully you can tell from the pictures what this finished step should look like.
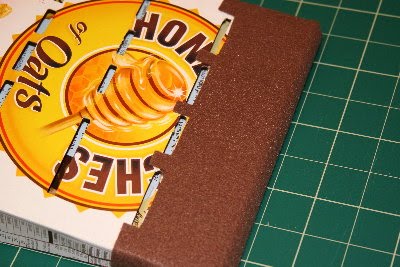 Next, I began covering the cardboard with various brown fabrics. I started at the top, wrapping the fabric around the top and sides, and stopping at the slits for the first row. This won't show on the finished product, and it's important to keep the slits clear.
 The next step was to align another piece of fabric. I tried to just fold it over and glue it in place, but I found the fabric tended to crumple when I inserted the popsicle sticks. I addressed this problem by adding a strip of cardboard and folding the fabric over the cardboard before adding it to the garden.
 I positioned the folded edge covering the slits, gluing the fabric in place just below the slits. (Be sure not to glue the fabric above the slits, or it will cut off the access.) Effectively, there's about 1/2" of "loose" fabric at the top, but it's supported by the piece of cardboard placed into the fold, and stabilized by gluing the fabric around the sides of the box. Then I trimmed the bottom of the fabric before the next row of slits.
 I repeated this until the whole box was covered with mixed brown fabric, wrapping the last piece around the sides and bottom so that the cardboard is completely covered.
 The popsicle stick is used for labeling the chore. I used a label maker, but you could also just write directly on the popsicle stick. Alternatively, if you put scotch tape on the popsicle stick, you can write on the scotch tape and just peel it off when you want to change it.
This idea would also be a great tool for other various learning activities, such as colors (the color of the veggie,) numbers (count the veggies,) or even the name of the veggie (reading and spelling.) And the garden theme helps kids to understand that food doesn't just magically appear at the grocery store. It's even a fun imagination activity without having any lesson at all.
 I arranged the veggies into the garden by slipping the popsicle stick between the folds, through a slit in the row.
 Next, I decided it needed a little picket fence. I cut down some square craft sticks and glued them together to make the fence.
 I glued the fence to the bottom of the garden.
 As a side note, you can also make it so that the veggies are inserted into the side too, you just need to plan for it (I glued my fabric down tightly so I couldn't.)
 Then I made a little sign to hang on the fence, identifying it as Jake's garden.
 I had a couple of mini tools in my
  And that's my version! Isn't it cute?! I just love it!
Wouldn't it be cute with a couple of blackbirds?
Or maybe a scarecrow? I'm going to start out the day with all the fruits and veggies in a jar or cup. Then as my son does a chore or service, he'll "plant" the veggie in his garden. As the day goes on, he'll be able to see the "fruit of his labor." Then at the end of the day, he can "harvest" his crop (pull the veggies from the garden,) bring it to market (to mom,) and sell it at the current market rate (get paid his allowance.)
If you try this tute, I would LOVE to see your version! It would be great to have a list of link-ups so others could benefit from your efforts. So let me know!
And while you're visiting, be sure to stop by and enter my give-away for a Custom Family Photo Block.

Be sure to check out the endless list of inspirational ideas at my home page childmade.com.

I'll be linking to some of the fabulous link parties listed on the right sidebar ... but really, that's a LOT of parties! I probably won't get to them all, but you should stop in and visit a few yourself.
While you're at it, stop by my home page and add a few links of your own!
Be sure to check out the endless list of inspirational ideas at my home page childmade.com.
I'll be linking to some of the fabulous link parties listed on the right sidebar ... but really, that's a LOT of parties! I probably won't get to them all, but you should stop in and visit a few yourself.
While you're at it, stop by my home page and add a few links of your own!