


Told you I'd be back with another one! This time, I've put together a pair of Christmas mice. Aren't they fun??
 Wanna make one?? Or two?
 Get your paper rolls ready! Cut them into 1/2 inch strips.
 Form one into a circle.
 Form another into a teardrop.
 Glue the teardrop to the top of the circle.
 Make two more circles and glue them on for ears.
 Now for the feet. For this step, you're really just trying to make something for the little mouse to stand on. Pinch a couple of tiny mounds into one side of a strip and glue them down. (If you'd like you can make the feet for the second mouse, below.)
 Glue the feet to the bottom of the body of the mouse.
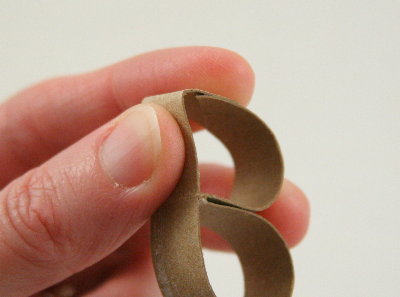
 Now you need to form the front paws. We did this shape for the paper roll puppy. Invert one of the creases, push it through to the other side and glue it in place.
 You can also add a spot of glue to the crease, it you have a stubborn tube.
 Place the front paws and glue.
 Make a tail by flattening and shaping a strip. Glue down the center.
 Attach the tail behind the feet.
 I decided that I wanted the ears together, so I just added a spot of glue between them.
 And that's it so far. Now it's time to paint him! I decided to make this little guy white.
Just a hint: cheap spray paint is no bargain. It takes too many coats to cover. Plus, this is paper, and you're really just wetting it down when you paint it, so less is more.
 Remember the detached face we made for the paper roll Easter bunny? Well it's time to do that again. Just glue two 5mm black poms to a 1/2" pink pom.
 When he's dry, glue the poms to his nose and dress him up with a few embellishments.
 Now for the second mouse. Same basic principle, just a little different assembly.
 These feet are less complicated than the first mouse. Start by offsetting one of the creases.
 Glue the center down.
 Glue the feet to the bottom of the mouse body and shape as needed.
 Make another set of paws, but this time, place it inside the mouse body.
 With that, she's looking pretty good, ready for a coat of paint!
 I decided to paint her black. After she dried, a few embellishments were in order.
 And now you have two sweet little paper roll mice, ready to share the holiday celebration with you!
 I'd love to see yours!Any ideas for other poses?
 Recycle and cheer, all at one time!
 Let me know how it goes for you!
Thanks for visiting! And be sure to check out the endless list of inspirational ideas at my home page childmade.com.


