


 Yes, I'm afraid I've been at it again. I can't really explain the appeal.
 I mean, I don't believe I spend anymore time in the "supply room" than anyone else, if you get my drift. I just can't help it! Certainly part of it is because it's uber cheap. Part of it is because it's a trash-to-treasure project. I don't know....
 ... but I just can't stay away.
 Okay, here we go. You know the routine -- cut your tubes into 1/2 inch strips. This time, you'll want to paint them mixed fall colors.
 I used red, orange, and brown. It's what I had. It works.
 Shape one strip into a circle. Arrange a variety of colored strips around it. You'll want to leave a gap on one section. I used 9 strips and it seemed to fit well.
 Glue the strips together and to the circle. I found it easy to glue the strips to each other first, then to the circle. They seem to just fan out nicely and arrange well for easy attachment to the center.
 Now for the feet. We did this same shape for the paper roll puppy. First, invert one of the folds and place a small drop of glue in the crease. Push the fold to the other side and glue the fold to the center of the opposite side.
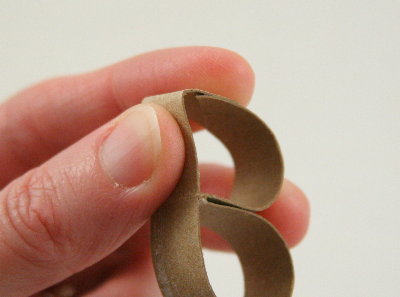 Add a crease to the outer edges of the loops created.
 Flatten out the edge between the corners.
 Glue the feet into the gap left between the feathers on the body. The feet will need to set flat so you might need to adjust your feathers slightly.
 Next you'll want to shape the head and neck. It's basically just a figure eight, or a two-part snowman.
 Glue the neck onto the bottom of the body just above the feet.
This is an awkward step. I haven't layered my projects before and this is the reason. It's really difficult to glue the "edge" of one piece onto the edge of another. So I have a suggestion for you. When you're cutting you're strips, leave two strips not completely separated, maybe with a 1/2 inch section uncut. Then you can simply shape the two pieces as needed while already connected to each other.
 From a piece of red felt, cut a long wattle. What's a wattle, you say? It's that red thing on a turkey that hangs from the side of it's nose. There's a little trivia for you to take to work/school!
 It's time to assemble a face. There's no real scientific method to this. I used a little yellow felt and two tiny black poms for eyes, then glued them all together with the wattle hanging down the side.
 Glue the face to the paper roll turkey. Since there really isn't a place on the head to glue the face, I had to get a little creative. I just glued the wattle to the edge and the face is sort of just floating. It's surprisingly stable.And that's all there is to it!Care to give it a try?
 What would Thanksgiving be without a turkey?
I'd love to see yours. You know you want to try it!
Thanks for visiting! Be sure to check back because I have 2 more paper roll tutorials coming up shortly that I think you'll really like for the Christmas holidays!
And be sure to check out the endless list of inspirational ideas at my home page childmade.com.

I'll be linking to some of the fabulous link parties listed on the right sidebar ... but really, that's a LOT of parties! I probably won't get to them all, but you should stop in and visit a few yourself. While you're at it, stop by my home page and add a few links there too!
I'll be linking to some of the fabulous link parties listed on the right sidebar ... but really, that's a LOT of parties! I probably won't get to them all, but you should stop in and visit a few yourself. While you're at it, stop by my home page and add a few links there too!