I'm sure you're like me in that you get sooo many greeting cards this time of year. Of course there's Christmas cards, some thank you cards, and even a few birthday cards thrown in.

It seems a shame to just toss them in the trash, especially when the front is usually untouched. I always save them with the intention of doing something with them, and I think that's going to be one of my winter projects.
I especially like using cards because they offer such great print options that I can't accomplish on my own, without buying card stock anyway. This way, I get to recycle and save money -- two of my favorite things!

My son received this nice thank you card from his teacher. It's basic with a nice print, and perfect except for the written note inside. Since my son needs to write a thank you note to an out-of-town grandma, I thought this would be a perfect one to start with. So I gathered a few simple embellishments and a matching card stock. This wasn't a "frilly" card, so the embellishments are quite simple.

I started by removing the front of the card from the back and trimming it up just slightly. I kept the back too, since it matches the front.

Then I measured out and cut a piece of card stock, making it a little more than twice the size of the trimmed card front. You can easily determine the size of the card stock if you copy the size of the original card before you disassemble it.

Fold the card stock in half.

Check the size by aligning the trimmed front. You can glue the trimmed front "as-is" to make the project very simple, but I encourage you to look for ways that you can dress it up.

I decided to cut out the "thank you" block.

Then I glued the card front to the front of the folded card stock. Be sure to check your fold direction before gluing so you don't end up with a card that opens the wrong way.

Next, I put grommets in the corners.

I placed a pop dot in the center of the cut-out...

... then positioned the "thank you" block onto the pop dot.

Next, I trimmed a few short pieces of satin ribbon and aligned them in a corner...

and added a tiny rhinestone onto the intersection.

I decided to use some of the back of the card on the inside to highlight the message. I'll print out a message later and glue it in the center.
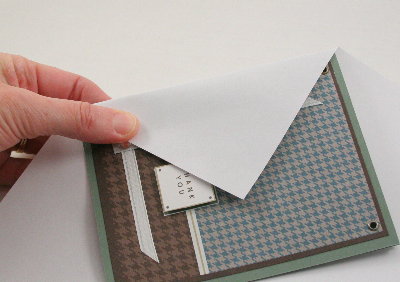
But cards need envelopes, right? And since the envelope that the card came in was written on, I needed to make a new one, which can be done with a plain sheet of paper. The easiest way to size the new envelope is to take the old one apart and make a template from it. However, in case that's not an option (I don't usually save the envelopes,) then I'll show you how to make one.

To size the envelope, align the two side corners of the card at one corner of the paper, positioning the card inset slightly from the edge of the paper.

Fold down the paper and crease. This crease will be your guide for the rest of the folds.

Flip the top back up and fold in the sides.

Fold up the bottom.

Next, open up the folds and remove the card. Trim the folds to the corners.

Be sure to trim the corners at the top as well, so that the card will insert easily.

Assemble the card, first folding in the sides and then the bottom. Glue in place.

Your finished card should slide easily into the new envelop. Since there isn't a pre-glued strip, you'll need to seal the envelope with a glue stick.

And there you have it! A "brand new" card, ready for signing and mailing.

I'm actually looking forward to getting started on the stack of Christmas cards! Although I'll probably start with the birthday cards, since I'm sure I'll need them before Christmas. I'll post some reworks as I do them.
So don't throw those cards away! This is just one of many ideas for their uses. I'd love to see what you put together!
And be sure to check out the endless list of inspirational ideas at my home page
childmade.com.
I'll be linking to some of the fabulous link parties listed on the right sidebar ... but really, that's a LOT of parties! I probably won't get to them all, but you should stop in and visit a few yourself.
While you're at it, stop by my home page and add a few links there too!


 I just knew I would like the finished texture, and I do!
 The weaving is very simple. I just cut a bunch of narrow strips of mixed colors of paper, about 1/8" wide, then began weaving them together.
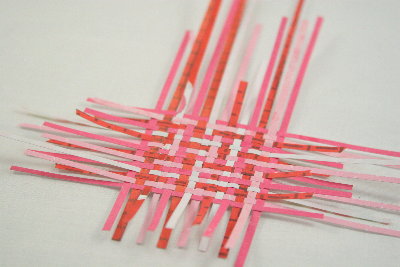 I interspersed the colors randomly to give it a mixed tone. As I added strips of paper, I used a fingernail to tighten the weave. When I reached my desired size, I secured the back with some clear tape to keep the outer strips from loosening as I continued to work it.
 Next, I turned the weave over and traced a heart shape onto the back.
 I carefully cut the heart from the weave. Having the back taped really helps keep the weave tight.
 And there you have your finished heart!
 I did another one that was similar, except that I made a smaller weave, and cut the heart at an angle, leaving the edges of the heart loose and rough.