Showing posts with label Christmas crafts. Show all posts

Sock Snowman

Here's another quick and easy idea for Christmas. It's inexpensive and great for younger children. For this craft, I modified a muslin and sock snowman I found on eHow.


The supplies you'll need are:
1 - small white sock
1 - small piece of orange felt
2 - 7mm black poms
1 - 6" thin strip of black felt, cut on one side with pinking shears
1 - 6" length of 1/8" red satin ribbon.
1 - small embellishment, such as a star or snowflake
2 - small rubber bands
fiberfil
For tools, you'll need sharp scissors and fabric glue, and optionally pinking sheers.

Begin by cutting the cuff from the sock, cutting across at the heel.

Loosely stuff the toes with fiberfil.

Secure the stuffed sock with a small rubber band.

Fold the red ribbon in half and tie the ends together with a large knot.

Insert the knotted end of the ribbon into the cut end of the sock cuff.

Secure the cut end of the cuff around the knotted end of the ribbon with a small rubber band. Tug the exposed loop of the ribbon to form a hanger.

Place the uncut end of the cuff over the rubber banded end of the stuffed toe section.

Roll back the edge of the cuff and secure with fabric glue.

Your sock should look something like this.

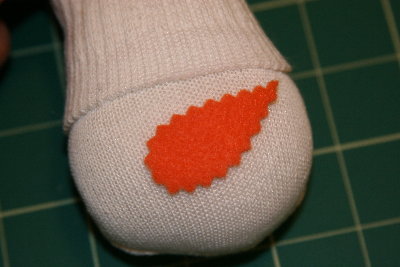
Next, cut the orange felt to make a nose. Pinking sheers add a nice decorative edge.

Apply a thin line of glue outlining the mouth.

Apply the strip of black felt onto the glue line for the mouth.

Add a spot of glue in the position of the eyes.

Place the two poms onto the spot of glue.

Add a spot of blush to the cheeks.

Glue the embellishment to the snowman hat.

And that's it! A cheery snowman to brighten someone's Christmas tree.

Let me know if you make one -- I'd love to feature your finished product!

And be sure to check out the endless list of inspirational ideas at my home page childmade.com.


I'll be linking to some of the fabulous link parties listed on the right sidebar ... but really, that's a LOT of parties! I probably won't get to them all, but you should stop in and visit a few yourself.
While you're at it, stop by my home page and add a few links there too!


Santa Snowman Earrings

It's that time again -- time to prepare for our annual Family Christmas Workshop event. Actually, it's been that time for a while, which is a good part of the reason why I've been absent for a bit. Now that the preparation is well underway, I'll catch you up on a number of the craft projects we're offering this year.

Each year we offer a pair of earrings. They are very simple to do, even for the youngest of visitors, and they make great gifts for teachers. This year, we're doing snowman earrings with a festive red Santa hat.

The supplies needed are 2 of each:
- French hook or equivalent
- extra-long quilter's pin (not the standard head pin, but an actual pin with a point)
- 10mm round white bead
- 6mm x 8mm red cone bead
- 5mm white pom
- 1"-length mini red rick-rack
- 1/2" square of plush fabric


Gather the supplies and lay them out on your work space. I find that working with jewelry crafts is always easier if done on a piece of fabric, like felt. It keeps the parts from rolling around, plus makes them easier to see.

Begin by folding a piece of the rick-rack in half, and spear the pin into the folded edge just inside the fold.

Slide the rick-rack to the head of the pin.

Next, add the round white bead.

There are some FABULOUS and inexpensive options for the 10mm white bead. The white agate is lovely, as well as the frosted crackle glass. Check out your options before settling on plain white.

Spear the piece of plush fabric in the center and slide it onto the pin to the top of the bead. There will be lots of excess fabric at this point, which is fine for now. You'll be trimming it up in a bit.

I used a plush fabric that reminded me of the same thing used for the super soft bathrobes. Fleece and terry cloth are additional options. It can be anything that will leave a little "fluff" when trimmed.

Next, slide on the bell bead, wide side against the plush fabric.

I learned after-the-fact that these are not easily found. I purchased mine off of ebay here. I haven't found them anywhere else. But you could also substitute a different shape and accomplish the same basic effect.

Now, position the point of the pin into the center of the pom and spear the "knot" on the inside of the pom. This might take a couple of tries, depending upon how tough your pom is. It's important to get the center of the pom, to keep it from pulling off the pin.

Using a sharp pair of scissors, trim the plush fabric to make a shapely trim for the hat.

You can experiment a little with different lengths for the trim. Just remember, you can always cut more but you can't put it back on. The pin hasn't been closed yet, so if you mess up, you can always slide the beads off and try with another piece of fabric.

When you're content with the trimming, use a pair of wire snips to cut off the point of the pin. You should have about 3/8" to 1/2" of wire left beyond the pom, depending upon the length of your pin. Shorten the remaining length if necessary.

Use your jewelry tool to turn the end of the wire to form a loop for the French hook. Insert the hook and close the loop.

And finally, use a sharp pair of scissors to trim the length of the rick-rack scarf to your preference.

And you're done! Aren't they fun?

You can change these up a bit and make them less seasonal by substituting different colors for the scarf and hat. And a semi-circle bead would give the effect of a sock hat, rather than a Santa hat.

To make it more general, substitute the 3-piece hat with a black cylinder bead and black sequin.

If you try this, I'd love to feature your finished project. Just let me know!


And be sure to check out the endless list of inspirational ideas at my home page childmade.com.


I'll be linking to some of the fabulous link parties listed on the right sidebar ... but really, that's a LOT of parties! I probably won't get to them all, but you should stop in and visit a few yourself.
While you're at it, stop by my home page and add a few links there too!


Hinged Wooden Snowman Family

As I mentioned in yesterday's post, I had gotten myself into a number of projects last week that snagged all my time. This is another one of the gifts I made, this one for my son's teacher.

And I thought I would share with you how this one was done too.

The first thing I did was cut my pieces of wood. I used a 1 x 4 that was in nice shape so it didn't require much sanding. I started by determining the length of the tallest snowman, then I adjusted the other sizes by about 2 inches each. I just did the measurements visually, so I don't know what they were exactly, but I believe the tallest one was about 18-20 inches. That's about as tall as you can go using only one hinge like I did.

I had a family of 5, so I cut 5 pieces. I needed to decide how to arrange the wood, whether I wanted it random...

... or descending. I decided that in this case, I liked the descending arrangement best.

I measured 3 1/2" from the bottom and placed the hinge. I spaced the wood apart about 3/8" to give the hinge room for movement.

After marking the hinge holes, I used a drill to make a pilot hole in each slot. I repeated this step with each board and each hinge. I skipped every other slot, then flipped the whole arrangement so I could place the backside hinges, which filled the spaces I skipped on the flip side.

I put in the screws temporarily, so I could test the size and functionality. I did this with all the hinges.

Then I took it all apart and applied several coats of paint. I painted the front, back and sides, but not the top and bottom.

I also applied a light coat of white spray paint to the hinges. Be careful not to apply too thick of a coat or it will interfere with the functionality of the hinge.

When the paint was dry, I sanded the corners.

Then I put the hinges in place.

So far so good.

Then I began preparing the hats. I decided to put the names on the cuff of the hats. I used an embroidery machine and made them out of fleece, but other options could be used. I think the names add a special personalized touch to the final project.

Next, I began assembling the hats. You can see a tutorial on the hats here. For these, my initial square of fabric was 8" x 9".

I added the cuffs with the names, alternating the height of the cuff to match the alternating height of the wood.

I wrapped a strip of fleece around the wood and looped it in the front to make scarves.

I used a sharp pair of scissors to fringe the ends of the scarf.

I made the noses out of craft foam, cutting them with a pair of pinking shears to give them the textured edge. I also added google eyes.

And the last thing I had to do was add the buttons.

And they're done!


And an added bonus is how neatly they fold up for easy storage. That is, if you ever put them away anyway!

Share your thoughts and your examples!

Here's a fun one done by Brooke at BrookePitcher.com. I think it turned out great! Check it out here!


And don't forget to check out the endless list of inspirational ideas at my home page childmade.com.