


I'm half Irish, so even though I'm not a fan of green, there's something almost sacrilegious about me not wearing green on St. Patrick's Day. So I've always opted for the quietly-understated-but-fulfilling-my-obligation approach. It used to be green underwear, but I got tired of arguing that I really was wearing green, then having to explain where my green was. Granted, that was a long time ago. Plus I don't have any green underwear anymore. TMI? I thought so.
Luckily, -- for you -- this is not going to be a tutorial for making green underwear. Instead, I'm going to show you how to make this lovely wired shamrock brooch! Relieved? I thought so.
 Your supplies -- green wire, faux rhinestones, a jewelry pin, glue, and pliers/wire snips. (Again with the short list! Less inventory for you, less typing for me -- we're both happy!)
 Begin by shaping your wire, curving and forming a small loop.
Your wire should be something that's workable for you. I happened to use a very soft wire that was green plastic coated. I didn't need to use pliers for anything but snipping. The wire I used for the Wired Hearts Brooch was much stiffer, and colored red. I had no problem with either one. But younger children won't likely have the dexterity to manage pliers, so softer wire is better. If you really need it to be more durable, thicker wire would be better. Pliers can scratch colored wire, so if you're not comfortable shaping wire with pliers, you might prefer the plastic-coated. Just keep in mind that the type of wire needs to fit your audience.
 Continue shaping your wire until you've formed a small heart. The loop in the heart is optional.
 Continue the direction of the wire and form a mirrored heart. Loop the excess wire over the center of the hearts.
 Form another loopy heart between the other two, feeding the excess wire through the intersection to the bottom.
 Loop the excess wire to form a stem and snip, ending the wire in the center of the shamrock.
 Apply a spot of glue to the center and position a faux rhinestone over the glue and the intersection of wire.
At this point, the pin could be completed simply by adhering the jewelry pin to the back. If you wanted something tiny, or you made your shamrock larger, this could be complete as-is.
 I opted to add to it, since my shamrock was only about an inch tall. I made another shamrock with a complimentary-colored green wire. I secured it to the other shamrock with a few small dots of glue behind the rhinestones.
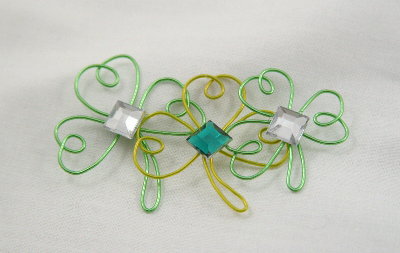 And I did one more shamrock in the original green and added it to the second.
 Another spot of glue behind a rhinestone secures the jewelry pin.
All done! Are you feeling lucky yet? Green with envy? Nauseous from my puns? Okay, I'm done too. But there will be more tomorrow (shamrocks and puns,) so be sure to check back!
Check out the endless list of inspirational ideas at my home page childmade.com.

I'll be linking to some of the fabulous link parties listed on the right sidebar ... but really, that's a LOT of parties! I probably won't get to them all, but you should stop in and visit a few yourself. While you're at it, stop by my home page and add a few links of your own to my perpetual link party!